Xamarin.Forms 是一个跨平台的、基于原生控件的UI工具包,开发人员可以轻松的创建适用于 Android,iOS 以及 Windows Phone的用户界面。Xamarin.Forms 通过使用平台的原生控件来渲染用户界面,使用 Xamarin.Forms 的 App在外观上与平台完全一致。通过本文您可以快速了解如何使用 Xamarin.Form 来进行应用程序的开发。
简介
Xamarin.Forms可以帮助开发人员快速的构建跨平台的UI,通过一次编码,生成多平台界面。如果你做的工作涉及到三个平台,那你会对重重复复的界面逻辑工作厌烦,Xamarin Forms 是一个好的解决方案。
Xamarin.Forms允许开发人员使用C#语言来快速构建UI界面,由于基于Xamarin.Forms开发的应用程序完全是原生的,它的受限很少,例如浏览器沙盒、底层API限制还有性能,相反它完全可以使用底层操作系统提供的API,例如iOS上的CoreMotion, PassKit, 和 StoreKit,安卓上的NFC和Google Play Services。这意味着你可以使用Xamarin.Forms来构建应用程序的UI,使用原生的语言来构建其他部分。
基于Xamarin.Forms开发的应用程序在架构上采用了共享逻辑层的跨平台方案,通常的方式是使用 Portable Libraries 或者 Shared Projects 来共享逻辑层代码,平台相关的部分可以享有这部分代码。
Xamarin的代码共享方案:
开发人员可以通过C#代码来直接构建Xamarin.Forms的UI,另外还可以通过 XAML 来构建,运行时的行为需要写在你另外一个对应的文件中。
本文将会介绍整个Xamarin.Forms框架的核心和基础概念,包括:
· 如何安装 Xamarin.Forms
· 在 Visual Studio和Xamarin Studio中建立 Xamarin.Forms的项目
· 如何使用Xamarin.Forms的控件
· 如何在页面之间进行导航
· 如何进行数据绑定
系统需求
iOS : 由于Apple限制iOS应用程式编译都需要透过Xcode, 因此需要1台MAC的机器作为Build Host.
· Windows 7 或更新的作业系统版本
· Visual Studio 2010 / 2012
· OS X Lion 或更新的作业系统版本
· Xcode IDE 以及 iOS SDK
Android : 对于Android开发, 则可以完全在Windows 上进行. 其系统需求如下:
· Windows 7 或更新的作业系统版本
· Java SDK
· Android SDK
· Xamarin.Android for Visual Studio
使用Xamarin Forms开始编程
开发人员可以在Xamarin Studio和Visual Studio中创建 Xamarin.Forms的项目,有四种项目类型可以选择:
Portable Library:用于代码共享的类库
Xamarin.Android Application:安卓应用程序
Xamarin.iOS Application:iOS应用程序
Windows Phone Application:Windows Phone 应用程序
在Xamarin Studio中,选择 File > New > Solution, 当New Solution对话框出现后,点击 C#>Mobile Apps, 然后选择 Blank App (Tamarin.Forms Portable),如下图:
输入项目名称 “HelloXamarinFormsWorld”,点击 OK,整个新的工程将会被创建,如下图:
Xamarin.Froms 应用程序
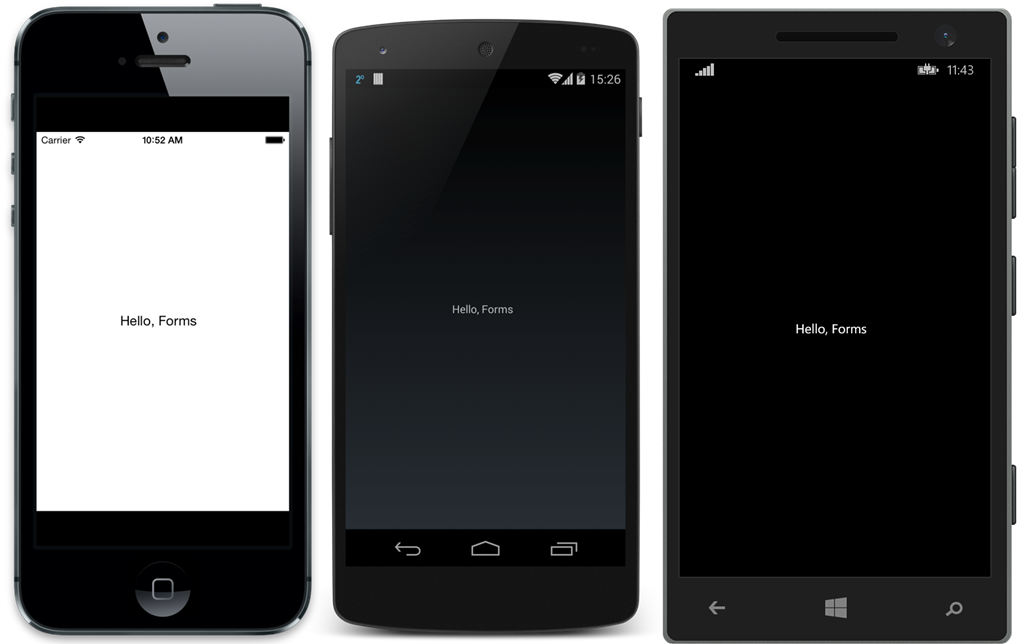
如果你运行上面的程序,会看见下面的画面:
Xamarin.Forms中每一个屏幕画面都有对应概念叫:Page,Xamarin.Forms.Page 在安卓中与 Activity对应,在 iOS 中与 ViewController对应,在Windows Phone中与Page对应。
当前的工程正是使用了 Xamarin.Forms.ContentPage ,在其上面添加了一个 Label 控件。App类型负责初始化应用程序的首页,如下面的例子:
public class App
{
public static Page GetMainPage()
{
return new ContentPage
{
Content = new Label
{
Text = "Hello, Forms !",
VerticalOptions = LayoutOptions.CenterAndExpand,
HorizontalOptions = LayoutOptions.CenterAndExpand,
},
};
}
}
上述的代码初始化了一个 ContentPage,并且放了一个竖直、水平都居中的Label在上面。
使用 Xamarin.Forms Page
Android
创建一个Activity类型,并且使用 MainLauncher 特性修饰,在 OnCreate 方法中,初始化Xamarin.Forms框架,然后设定初始界面,如下面的代码:
namespace HelloXamarinFormsWorld.Android
{
[Activity(Label = "HelloXamarinFormsWorld",
MainLauncher = true,
ConfigurationChanges = ConfigChanges.ScreenSize | ConfigChanges.Orientation)]
public class MainActivity : AndroidActivity
{
protected override void OnCreate(Bundle bundle)
{
base.OnCreate(bundle);
Xamarin.Forms.Forms.Init(this, bundle);
SetPage(App.GetMainPage());
}
}
}
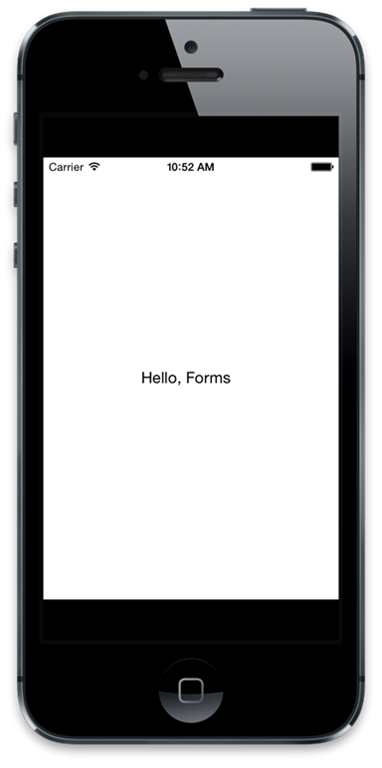
运行上面的代码:
iOS
对于Xamarin.iOS应用程序,在AppDelegate的FinishedLaunching方法中,首先初始化Xamarin.Forms框架,然后设定RootViewController为 Xamarin.Forms的Page类型,如下面的代码:
[Register("AppDelegate")]
public partial class AppDelegate : UIApplicationDelegate
{
UIWindow window;
public override bool FinishedLaunching(UIApplication app, NSDictionary options)
{
Forms.Init();
window = new UIWindow(UIScreen.MainScreen.Bounds);
window.RootViewController = App.GetMainPage().CreateViewController();
window.MakeKeyAndVisible();
return true;
}
}
运行上面的代码:
Windows Phone
Windows Phone的做法与上面两种类似,不解释,直接上代码:
public partial class MainPage : PhoneApplicationPage
{
public MainPage()
{
InitializeComponent();
Forms.Init();
Content = HelloXamarinFormsWorld.App.GetMainPage().ConvertPageToUIElement(this);
}
}
现在我们对于Xamarin.Forms有了一定的了解,然我们继续了解其他的一些东西。
视图与布局
Xamarin.Forms使用控件来进行布局,在运行时每一个控件都会对应一个原生控件,我们经常会使用下面的类型来构建UI。
View - 通常指的是Label,Button以及输入框等等
Page - 一个单独的screen,对应的概念是 Android Activity,Windows Phone Page 以及 iOS View Controller.
Layout - 布局或者容器控件
Cell - 表格或者列表控件的子项目
常用控件:
Xamarin.Forms 控件
描述
Label
只读的文本展示控件
Entry
单行的文本输入框
Button
按钮
Image
图片
ListView
列表控件
Xamarin.Forms有两种不同类型的容器控件:
Managed Layout - 与CSS的盒模型类似,通过设定子控件的位置和大小来进行布局,应用程序不再直接设定子控件的位置,最常见的例子就是 StackLayout。
Unmanaged Layouts - 与Managed Layout不同,开发人员需要直接设定子控件的位置和大小,常见的例子就是 AbsoluteLayout。
接下来我们再仔细讨论这两种布局方式:
堆栈式布局
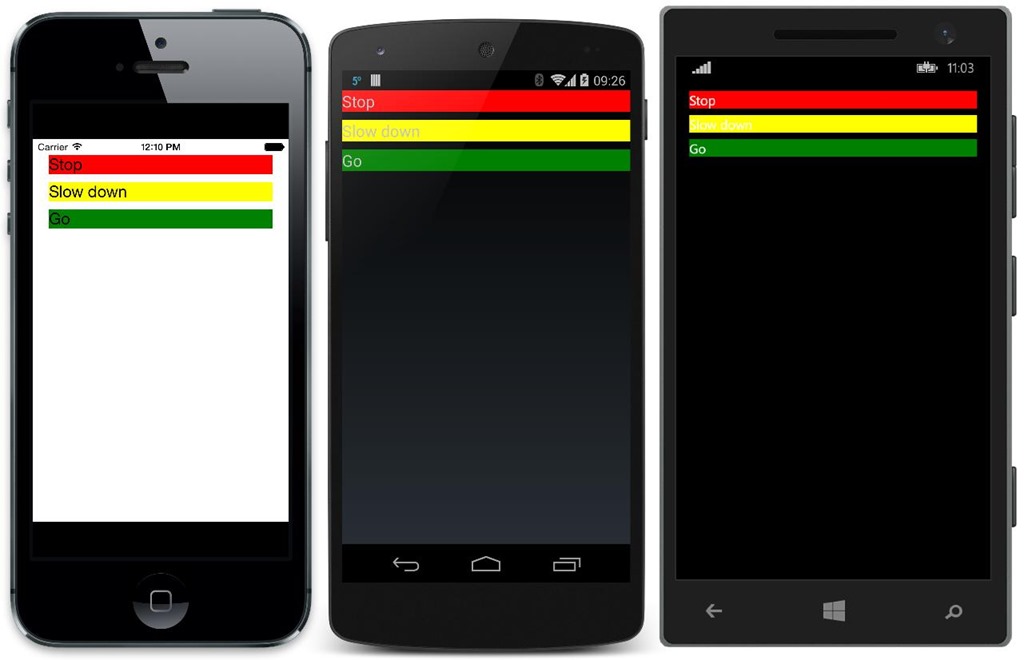
堆栈式布局是一种非常常用的布局方式,可以极大地的简化跨平台用户界面的搭建。堆栈式布局的子元素会按照添加到容器中的顺序一个接一个被摆放,堆栈式布局有两个方向:竖直与水平方向。
下面的代码会把三个 Label 控件添加到 StackLayout 中去。
public class StackLayoutExample: ContentPage
{
public StackLayoutExample()
{
Padding = new Thickness(20);
var red = new Label
{
Text = "Stop",
BackgroundColor = Color.Red,
Font = Font.SystemFontOfSize (20)
};
var yellow = new Label
{
Text = "Slow down",
BackgroundColor = Color.Yellow,
Font = Font.SystemFontOfSize (20)
};
var green = new Label
{
Text = "Go",
BackgroundColor = Color.Green,
Font = Font.SystemFontOfSize (20)
};
Content = new StackLayout
{
Spacing = 10,
Children = { red, yellow, green }
};
}
}
下面使用了XAML来构建界面:
<?xml version="1.0" encoding="utf-8" ?>
<ContentPage xmlns="
http://xamarin.com/schemas/2014/forms"
xmlns:x="
http://schemas.microsoft.com/winfx/2006/xaml"
x:Class="HelloXamarinFormsWorldXaml.StackLayoutExample1"
Padding="20">
<StackLayout Spacing="10">
<Label Text="Stop"
BackgroundColor="Red"
Font="20" />
<Label Text="Slow down"
BackgroundColor="Yellow"
Font="20" />
<Label Text="Go"
BackgroundColor="Green"
Font="20" />
</StackLayout>
</ContentPage>
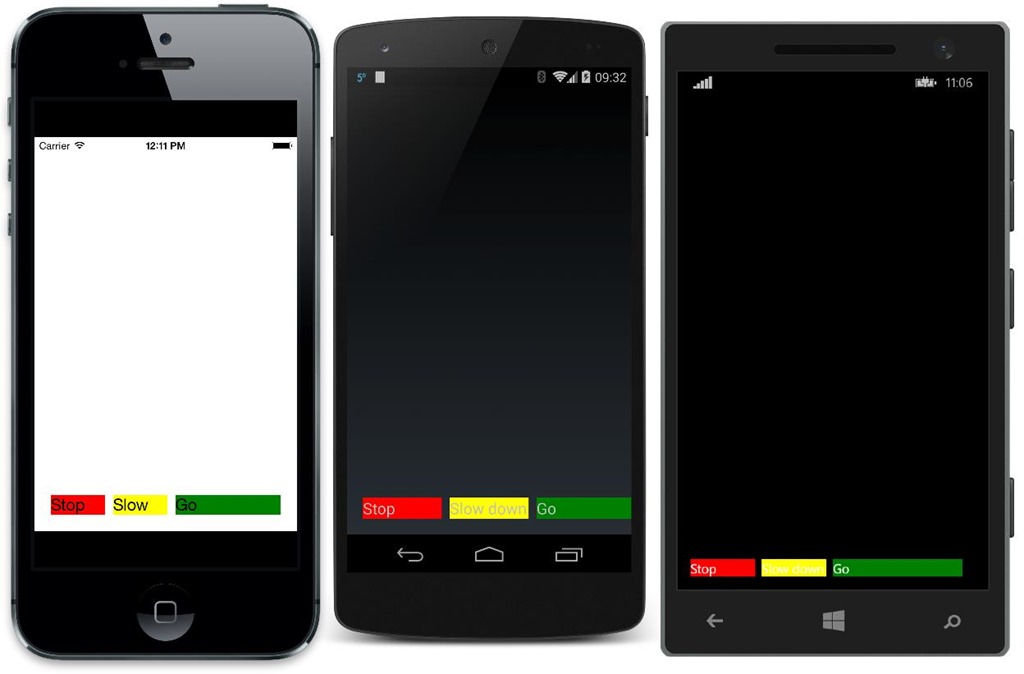
StackLayout 默认是竖直方向,运行上面的代码,运行结果如下:
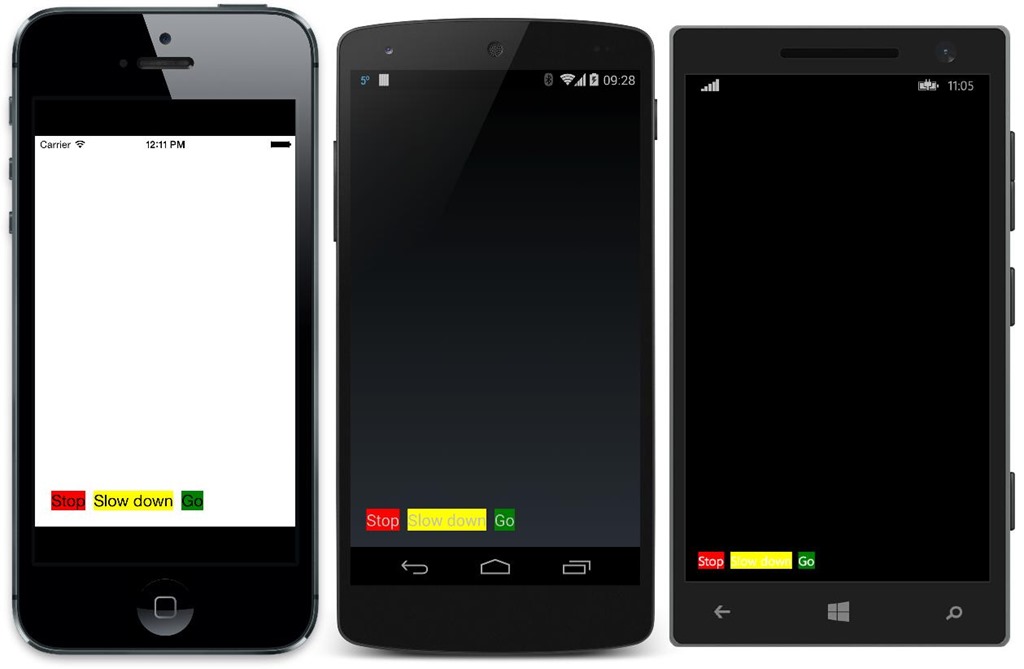
将布局方向改为水平方向:
public class StackLayoutExample: ContentPage
{
public StackLayoutExample()
{
// Code that creates labels removed for clarity
Content = new StackLayout
{
Spacing = 10,
VerticalOptions = LayoutOptions.End,
Orientation = StackOrientation.Horizontal,
HorizontalOptions = LayoutOptions.Start,
Children = { red, yellow, green }
};
}
}
XAML:
<?xml version="1.0" encoding="utf-8" ?>
<ContentPage xmlns="
http://xamarin.com/schemas/2014/forms"
xmlns:x="
http://schemas.microsoft.com/winfx/2006/xaml"
x:Class="HelloXamarinFormsWorldXaml.StackLayoutExample2"
Padding="20">
<StackLayout Spacing="10"
VerticalOptions="End"
Orientation="Horizontal"
HorizontalOptions="Start">
<Label Text="Stop"
BackgroundColor="Red"
Font="20" />
<Label Text="Slow down"
BackgroundColor="Yellow"
Font="20" />
<Label Text="Go"
BackgroundColor="Green"
Font="20" />
</StackLayout>
</ContentPage>
下面是运行结果:
在StackLayout中我们可以通过 HeightRequest和 WidthRequest指定子元素的高度和宽度:
var red = new Label
{
Text = "Stop",
BackgroundColor = Color.Red,
Font = Font.SystemFontOfSize (20),
WidthRequest = 100
};
var yellow = new Label
{
Text = "Slow down",
BackgroundColor = Color.Yellow,
Font = Font.SystemFontOfSize (20),
WidthRequest = 100
};
var green = new Label
{
Text = "Go",
BackgroundColor = Color.Green,
Font = Font.SystemFontOfSize (20),
WidthRequest = 200
};
Content = new StackLayout
{
Spacing = 10,
VerticalOptions = LayoutOptions.End,
Orientation = StackOrientation.Horizontal,
HorizontalOptions = LayoutOptions.Start,
Children = { red, yellow, green }
};
XAML:
<?xml version="1.0" encoding="utf-8" ?>
<ContentPage xmlns="
http://xamarin.com/schemas/2014/forms"
xmlns:x="
http://schemas.microsoft.com/winfx/2006/xaml"
x:Class="HelloXamarinFormsWorldXaml.StackLayoutExample3"
Padding="20">
<StackLayout Spacing="10"
VerticalOptions="End"
Orientation="Horizontal"
HorizontalOptions="Start">
<Label Text="Stop"
BackgroundColor="Red"
Font="20"
WidthRequest="100" />
<Label Text="Slow down"
BackgroundColor="Yellow"
Font="20"
WidthRequest="100" />
<Label Text="Go"
BackgroundColor="Green"
Font="20"
WidthRequest="200" />
</StackLayout>
</ContentPage>
下面试运行结果:
绝对布局
绝对布局类似于Windows Forms布局,需要指定每一个子元素的位置。
下面是一个例子:
public class MyAbsoluteLayoutPage : ContentPage
{
public MyAbsoluteLayoutPage()
{
var red = new Label
{
Text = "Stop",
BackgroundColor = Color.Red,
Font = Font.SystemFontOfSize (20),
WidthRequest = 200,
HeightRequest = 30
};
var yellow = new Label
{
Text = "Slow down",
BackgroundColor = Color.Yellow,
Font = Font.SystemFontOfSize (20),
WidthRequest = 160,
HeightRequest = 160
};
var green = new Label
{
Text = "Go",
BackgroundColor = Color.Green,
Font = Font.SystemFontOfSize (20),
WidthRequest = 50,
HeightRequest = 50
};
var absLayout = new AbsoluteLayout();
absLayout.Children.Add(red, new Point(20,20));
absLayout.Children.Add(yellow, new Point(40,60));
absLayout.Children.Add(green, new Point(80,180));
Content = absLayout;
}
}
XAML:
<?xml version="1.0" encoding="utf-8" ?>
<ContentPage xmlns="
http://xamarin.com/schemas/2014/forms"
xmlns:x="
http://schemas.microsoft.com/winfx/2006/xaml"
x:Class="HelloXamarinFormsWorldXaml.AbsoluteLayoutExample"
Padding="20">
<AbsoluteLayout>
<Label Text="Stop"
BackgroundColor="Red"
Font="20"
AbsoluteLayout.LayoutBounds="20,20,200,30" />
<Label Text="Slow down"
BackgroundColor="Yellow"
Font="20"
AbsoluteLayout.LayoutBounds="40,60,160,160" />
<Label Text="Go"
BackgroundColor="Green"
Font="20"
AbsoluteLayout.LayoutBounds="80,180,50,50" />
</AbsoluteLayout>
</ContentPage>
运行上面的代码,结果如下:
子元素添加到容器中的顺序会影响子元素的Z-Order,上面的例子中会发现第一个添加的元素会被后面添加的元素遮住。
列表
ListView是一个非常常见的控件,用于展现一组数据,每一个条目都会被包含在一个单元格内部。默认情况下ListView使用了一个 TextCell作为模板来展现每一个条目数据。
参见下面的代码:
var listView = new ListView
{
RowHeight = 40
};
listView.ItemsSource = new string []
{
"Buy pears",
"Buy oranges",
"Buy mangos",
"Buy apples",
"Buy bananas"
};
Content = new StackLayout
{
VerticalOptions = LayoutOptions.FillAndExpand,
Children = { listView }
};
运行代码结果如下:
绑定数据
ListView也可以绑定自定义数据类型,如下:
public class TodoItem {
public string Name { get; set; }
public bool Done { get; set; }
}
绑定数据到ListView
listView.ItemsSource = new TodoItem [] {
new TodoItem {Name = "Buy pears"},
new TodoItem {Name = "Buy oranges", Done=true},
new TodoItem {Name = "Buy mangos"},
new TodoItem {Name = "Buy apples", Done=true},
new TodoItem {Name = "Buy bananas", Done=true}
};
设定展现数据:
listView.ItemTemplate = new DataTemplate(typeof(TextCell));
listView.ItemTemplate.SetBinding(TextCell.TextProperty, "Name");
上述代码的运行结果与上面一个例子一样。
选择条目
通过ItemSelected事件我们可以知道当前选中的条目:
listView.ItemSelected += async (sender, e) => {
await DisplayAlert("Tapped!", e.SelectedItem + " was tapped.", "OK");
};
在ItemSelected事件中我们已可以进行页面导航:
listView.ItemSelected += async (sender, e) => {
var todoItem = (TodoItem)e.SelectedItem;
var todoPage = new TodoItemPage(todoItem); // so the new page shows correct data
await Navigation.PushAsync(todoPage);
};
自定义单元格样式
考虑下面的单元格样式:
上面的单元格包含了一个Image控件,两个 Label 控件,下面的代码可以很容易的构建上面的布局:
class EmployeeCell : ViewCell
{
public EmployeeCell()
{
var image = new Image
{
HorizontalOptions = LayoutOptions.Start
};
image.SetBinding(Image.SourceProperty, new Binding("ImageUri"));
image.WidthRequest = image.HeightRequest = 40;
var nameLayout = CreateNameLayout();
var viewLayout = new StackLayout()
{
Orientation = StackOrientation.Horizontal,
Children = { image, nameLayout }
};
View = viewLayout;
}
static StackLayout CreateNameLayout()
{
var nameLabel = new Label
{
HorizontalOptions= LayoutOptions.FillAndExpand
};
nameLabel.SetBinding(Label.TextProperty, "DisplayName");
var twitterLabel = new Label
{
HorizontalOptions = LayoutOptions.FillAndExpand,
Font = Fonts.Twitter
};
twitterLabel.SetBinding(Label.TextProperty, "Twitter");
var nameLayout = new StackLayout()
{
HorizontalOptions = LayoutOptions.StartAndExpand,
Orientation = StackOrientation.Vertical,
Children = { nameLabel, twitterLabel }
};
return nameLayout;
}
}
自定义单元格创建完毕后,绑定数据源到ListView
List<Employee> myListOfEmployeeObjects = GetAListOfAllEmployees();
var listView = new ListView
{
RowHeight = 40
};
listView.ItemsSource = myListOfEmployeeObjects;
listView.ItemTemplate = new DataTemplate(typeof(EmployeeCell));
使用XAML构建自定义单元格
<?xml version="1.0" encoding="utf-8" ?>
<ContentPage xmlns="
http://xamarin.com/schemas/2014/forms"
xmlns:x="
http://schemas.microsoft.com/winfx/2006/xaml"
xmlns:local="clr-namespace:XamarinFormsXamlSample;assembly=XamarinFormsXamlSample"
xmlns:constants="clr-namespace:XamarinFormsSample;assembly=XamarinFormsXamlSample"
x:Class="XamarinFormsXamlSample.Views.EmployeeListPage"
Title="Employee List">
<ListView x:Name="listView"
IsVisible="false"
ItemsSource="{x:Static local:App.Employees}"
ItemSelected="EmployeeListOnItemSelected">
<ListView.ItemTemplate>
<DataTemplate>
<ViewCell>
<ViewCell.View>
<StackLayout Orientation="Horizontal">
<Image Source="{Binding ImageUri}"
WidthRequest="40"
HeightRequest="40" />
<StackLayout Orientation="Vertical"
HorizontalOptions="StartAndExpand">
<Label Text="{Binding DisplayName}"
HorizontalOptions="FillAndExpand" />
<Label Text="{Binding Twitter}"
Font="{x:Static constants:Fonts.Twitter}"/>
</StackLayout>
</StackLayout>
</ViewCell.View>
</ViewCell>
</DataTemplate>
</ListView.ItemTemplate>
</ListView>
</ContentPage>
数据绑定
通过数据绑定Xamarin.Forms的控件可以展示数据层的数据,还可以通过编辑控件将更改同步到数据层。
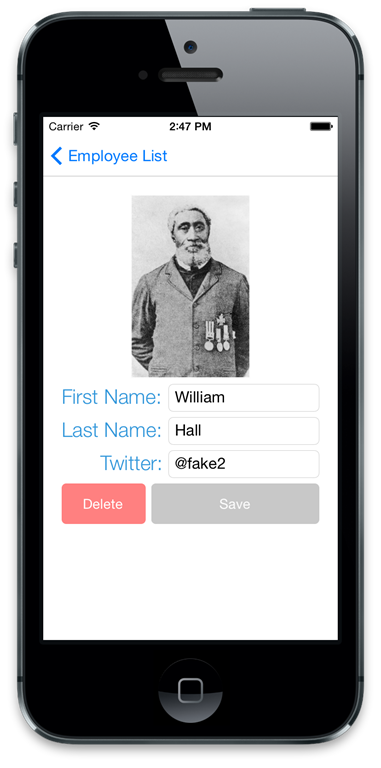
为了更好的理解数据绑定,看下面的画面:
该页面包含了下列的控件:
· Xamarin.Forms.Image
· Xamarin.Forms.Label
· Xamarin.Forms.Entry
· Xamarin.Forms.Button
在页面的构造函数中,将业务数据传入,并且设定数据绑定:
public EmployeeDetailPage(Employee employeeToDisplay)
{
this.BindingContext = employeeToDisplay;
var firstName = new Entry()
{
HorizontalOptions = LayoutOptions.FillAndExpand
};
firstName.SetBinding(Entry.TextProperty, "FirstName");
// Rest of the code omitted…
}
页面导航
现在我们已经了解了如何创建页面,以及如何添加控件,接下来我们会讨论如何进行页面导航。页面导航可以理解为一个后进先出的堆栈结构,展现一个页面相当于在堆栈中添加一个元素,如果需要回到前一个页面,就需要把当前的页面从堆栈中删除。
Xamarin.Forms 定义了 INavigation 接口来处理页面导航相关的逻辑:
public interface INavigation
{
Task PushAsync(Page page);
Task<Page> PopAsync();
Task PopToRootAsync();
Task PushModalAsync(Page page);
Task<Page> PopModalAsync();
}
NavigationPage 类型实现了这个接口,并且在屏幕的顶部添加了导航条,除了显示当前页面的标题外,还有一个返回的按钮。下面的代码就是使用 NavigationPage 的例子:
public static Page GetMainPage()
{
var mainNav = new NavigationPage(new EmployeeListPage());
return mainNav;
}
如果希望显示 LoginPage,使用 PushAync 方法将 LoginPage加入堆栈中:
await Navigation.PushAsync(new LoginPage());
如果希望返回原有页面,调用 PopAsync方法:
await Navigation.PopAsync();
如果希望弹出模态对话框,方法是类似的:
await Navigation.PushModalAsync(new LoginPage());
返回原有页面:
await Navigation.PopModalAsync();
小结
本文讨论了 Xamarin.Forms 是什么,以及如何使用 Xamarin.Forms 来构建跨平台的应用,我们从如何安装 Xamarin.Forms,到如何创建一个 Xamarin.Forms 项目,如何构建用户界面,如何进行数据绑定以及如何切换页面。目前已有部分产品支持 Xamarin.Forms,其中值得一提的是
ComponentOne Studio for Xamarin,它是 Xamarin 平台的原生移动控件集,为安卓、iOS、Windows Phone提供一致的体验,使用相同的API跨越所有平台。
参考原文:
An Introduction to Xamarin.Forms